
Some mould is easy to spot. You might notice it spreading across walls or ceilings in your home. But not all mould is so visible. It can also develop behind furniture, inside cabinets, or even within your walls, where it often goes undetected.
Hidden mould can remain unnoticed for months or even years. During that time, it can spread extensively, causing significant damage to your property. In more severe cases, it can get into your drywall and insulation, leading to tens of thousands of dollars in repairs. At the same time, prolonged exposure can contribute to ongoing health issues for the people living in the home.
In this article, we’ll show you how to spot mould in a home so you can act quickly, protect your family, and take appropriate steps to keep yourself during a real estate transaction. We’ll also answer common questions about what mould actually is and how serious its health impacts can be.
What is Mould?
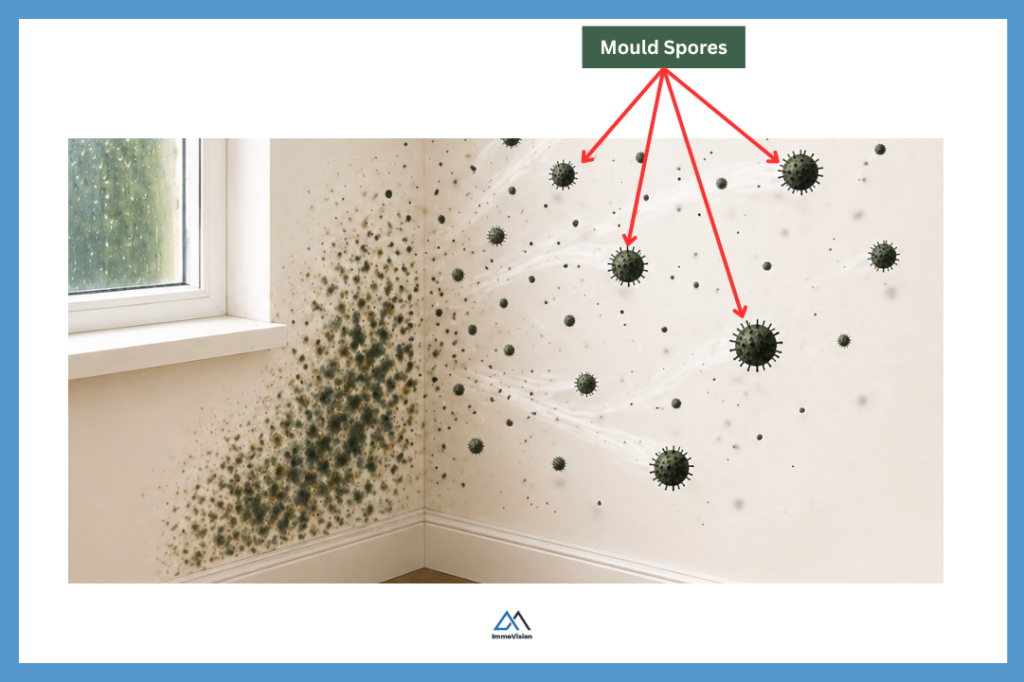
Mould is a type of living thing that grows in damp places, sort of like a collection of tiny plants. However, unlike plants, mould does not need sunlight to grow. Instead, it feeds on materials like wood, drywall, and dust, and it spreads by releasing microscopic spores into the air that can settle and grow on new surfaces.
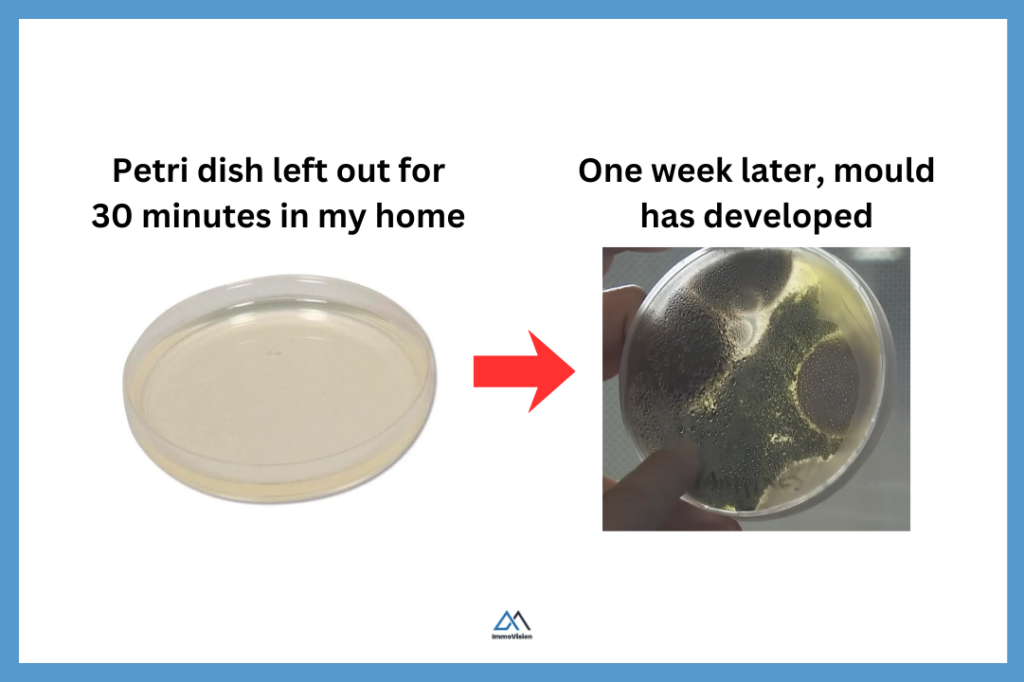
There are thousands of different types of mould, and their microscopic spores are always present in the air, both indoors and outdoors. You can test this by leaving an open mould culture plate in a room in your home. After a few days, mould will begin to grow on the plate.
The presence of mould does not necessarily indicate a problem, as mould spores are naturally present in the air in most environments. It only becomes an issue if the concentration of mould spores indoors is significantly higher than normal outdoor levels.
Is Mould Bad For My Health
Mould can affect your health, but the impact depends on the type of mould, the amount present, and your individual sensitivity.
There are thousands of types of mould, and their spores are always present in the air. In most cases, this background level is harmless. Problems arise when mould begins growing indoors. This increases the concentration of spores in the air you breathe, which can trigger symptoms similar to seasonal allergies, such as sneezing, congestion, and itchy eyes. For most healthy people, although they experience persistent discomfort, this is the main health impact.
Individuals with existing health conditions are more at risk. People with asthma, allergies, or weakened immune systems may experience more severe or persistent symptoms. For example, a type of mould called aspergillus can, in rare cases, grow in existing lung cavities and cause a condition that may require medical treatment, and occasionally surgery.
In short, while mould is usually not dangerous at normal background levels, active growth inside the home can affect health. For this reason, the standard advice is to identify and remove indoor mould.
How Does Mould Get Into The Home?
Mould gets into homes very easily because it is already present throughout the natural environment. It is also airborne, which means spores can enter your home through open windows, doors, ventilation systems, or be carried in on clothes, shoes, pets, and even plants.
Once inside your home, mould spores can settle almost anywhere, but visible mould growth only develops in areas where conditions allow colonies to form, specifically where there is consistently high moisture and a suitable food source. This is because mould needs moisture to activate and grow, along with organic materials such as cellulose, starches, or sugars to feed on and support its growth. For this reason, it is commonly found in bathrooms, kitchens, around windows, inside walls, and near pipes or ductwork in your HVAC system.
How to Find Mould in a House?
Some mould is immediately obvious. For instance, you may see it growing on the walls and on the ceiling of your home. However, there is also mould that is not so easy to spot. For instance, behind furniture, inside cabinets, or inside your walls. Below are three things to watch out for, so that you can quickly identify mould, before it has time to spread.
1. Unevenly Spread Dust
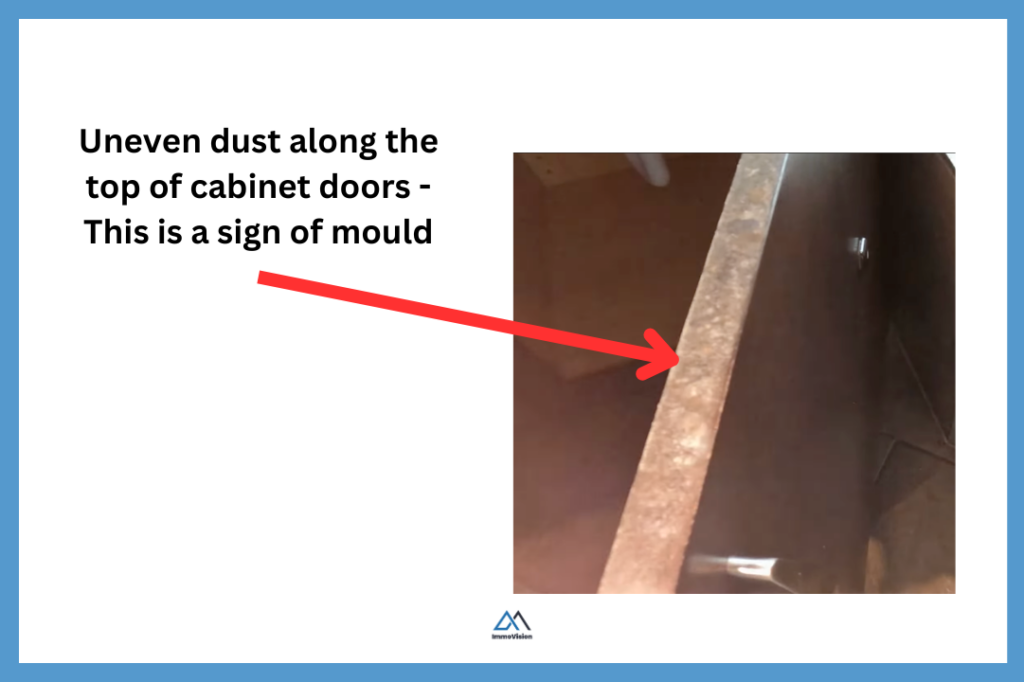
When looking for hidden mould in a home, start by checking dusty areas where excess moisture may be present. Mould growth often begins in household dust, where airborne spores settle. In humid conditions, tiny water droplets can form, activating these spores and allowing mould to grow.
Use a strong flashlight and shine it directly across dusty surfaces. What you’re looking for are signs of uneven dust distribution, as shown in the image below. These irregular patterns can indicate areas where moisture has been present and mould is starting to develop.
Typically you will want to look in the following locations:
- On top of cabinet doors
- Inside drawers
- Under or behind furniture
- On the outside of HVAC vents
- On top of light switches
- Along baseboards
- Around window sills
- At the back of closets
- Behind larger items that aren’t moved often (e.g., storage bins, bookshelves, suitcases)
⚠️ Important
If mould grows on surfaces that are dusty and damp, to avoid mould, you need to make sure that all areas of your home are clean and dry. This means that you should regularly clean the dust off all surfaces, which does mean moving furniture around.
2. Bubbling Paint
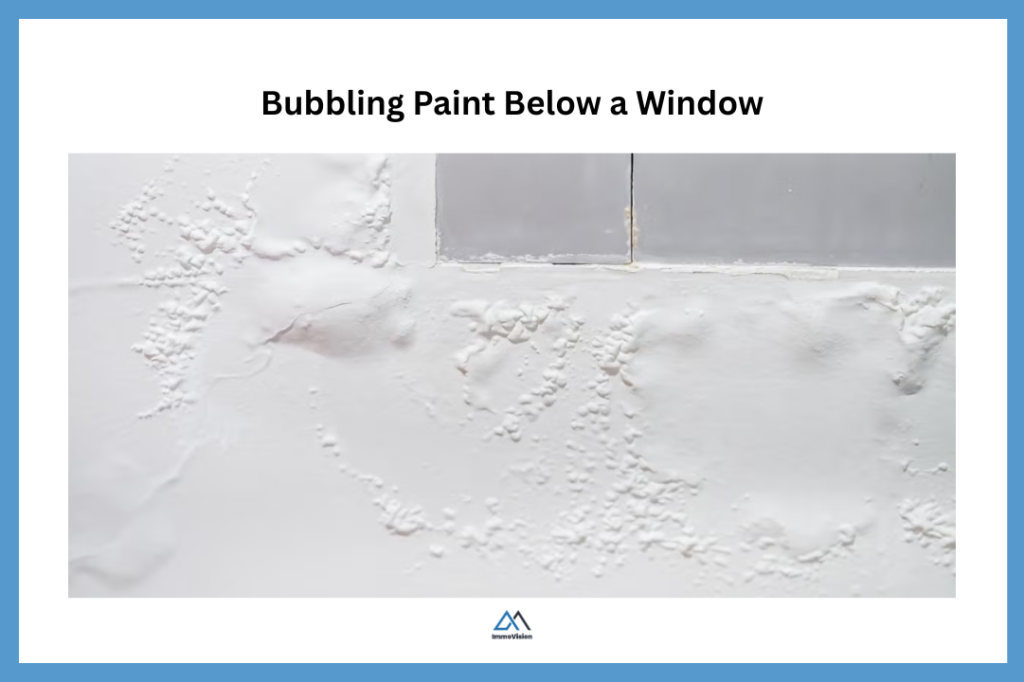
Paint bubbles when something is pushing it away from the wall surface. The most common cause is moisture trapped behind the paint layer. That moisture can come from water intrusion through exterior walls, a leak in your roof, window, or pluming, condensation, and high indoor humidity.
Bubbling paint is therefore a sign that you may have water inside of your dry wall. This creates the damp conditions mould needs to grow, allowing it to develop beneath the surface, often out of sight. If you notice this, it’s important to identify and fix the source of the moisture. In many cases, this involves removing a section of drywall to inspect the extent of the damage and ensure that any hidden mould is properly addressed.
3. Musty Smell
As mould grows, it produces microbial volatile organic compounds (MVOCs), which create the familiar musty odour often compared to damp soil or a locker room. Importantly, mould spores themselves don’t smell, the odour comes from active growth as mould feeds on materials in the home. This means that whilst the term “musty” is commonly used, the smell can vary depending on the type of mould and the conditions it’s growing in, including the materials involved.
If you notice a musty smell, your first step should be to look for the source. A common culprit is the HVAC system which has a lot of places where mould can grow, but the odour can come from any area where mould is present. In some cases, you may not have mould, and it may simply be the result of high indoor humidity.
If you can’t identify the source, it’s best to reduce humidity levels by improving ventilation or using a dehumidifier, and consider having a professional mould inspection to rule out hidden mould.
What kind of damage can mould do to your home?
Mould is a sign that your home has excess moisture, which on its own can weaken structural components and lead to ongoing deterioration if not addressed. For example, if moisture accumulates in subflooring or structural framing, it can cause wood to warp and weaken over time, leading to issues such as sagging floors. In more severe cases, prolonged moisture exposure can lead to conditions like dry rot, also known as serpula lacrymans.
However, mould can accelerate this damage by breaking down organic materials like wood framing and drywall, while also spreading contamination to other areas of the home. In addition, mould can cause staining and produce persistent odours that may permanently affect surfaces and finishes.
❗Note
Many mould issues are not obvious until it is too late. Given the size of the investment in your home and the potential cost of repairs, you may consider having your home professionally checked for hidden moisture or mould growth every 2 – 3 years, even if there are no obvious signs, so small issues can be identified and addressed early.
What is a Professional Mould Inspection?
A professional mould inspection is typically conducted by an indoor environmental specialist. These professionals are trained not only in mycology (the study of fungi), but also in building construction and the mechanics of HVAC systems. This allows them to do far more than simply collect samples—they can identify the underlying causes of mould growth and how it spreads within a home.
In this section, we’ll briefly outline the four key steps a professional mould inspector takes, so you can better understand what a thorough inspection should include.
- Review the property and occupant history
- Conduct a comprehensive visual inspection
- Perform diagnostic testing and air/surface sampling
- Prepare a detailed report with findings and recommendations
Let’s take a quick look at each of these points now.
1. Review the property and occupant history
In the first 15–30 minutes of an inspection, most mould inspectors will ask the homeowner questions about the history of the property and its occupants. This helps identify any past water leaks, ongoing moisture issues, recurring mould problems, and whether occupants have experienced any related health symptoms.
This information allows the inspector to build a clearer picture of the home’s conditions and potential risk factors. With this context, they can focus their investigation on the most likely sources of moisture and mould growth within the property.
For example, if the inspector knows the windows are due for replacement, they may recognize that condensation might not be noticeable during the summer months. However, they will anticipate that in colder weather, the same issue could lead to significant moisture buildup and potential mould growth.
2. Conduct a comprehensive visual inspection
Once the inspector has a clear understanding of the home’s history and its occupants, the next step is to carry out a comprehensive visual inspection of the property. The inspector will begin by examining any high-risk areas identified during the initial assessment. They will also evaluate the building structure and mechanical systems. This allows them to start forming a working hypothesis about what may be causing moisture buildup or mould growth.
Based on these observations, the inspector can determine which types of sampling, if any, are appropriate. Since all sampling methods have limitations, it’s important to select the right tests for the situation.
A thorough visual inspection takes time. Inspectors may need to remove and replace panels, look behind and beneath fixtures, and access concealed areas where moisture and mould are likely to develop. For a 2,000 square foot property, it is reasonable to expect this process to take approximately 1.5 to 2 hours.
3. Perform diagnostic testing and air/surface sampling
Now that the mould inspector has a good understanding of what the issues might be, they are going to take some samples to prove or disprove any hypothesis that they may have formed. To do this, they use a range of tools. Below are some examples of tools that mould inspectors use and what they use them for.
| Tool | Description | Purpose in Mould Inspection |
|---|---|---|
 |
Hygrometer
Measures temperature, humidity, dew point, and wet bulb temperature. |
Helps assess indoor moisture conditions and identify areas at risk of condensation and mould growth. |
 |
Particle Counter
Measures airborne particle concentration in real time. |
Provides insight into indoor air quality and potential airborne contamination levels. |
 |
Thermal Imaging Camera
Detects temperature variations in building materials. |
Identifies cold spots and thermal bridging where hidden moisture and condensation may form. |
 |
Moisture Meter
Measures moisture content within building materials. |
Detects water intrusion in drywall, wood, and other materials, especially around windows and baseboards. |
 |
Anemometer
Measures air velocity and airflow. |
Used to test HVAC systems and exhaust fans to ensure proper ventilation and moisture removal. |
 |
High-Intensity Flashlight
Provides strong directional lighting for inspection. |
Reveals subtle signs of mould, staining, dust patterns, and surface irregularities. |
 |
Air Sampling Pump
Draws a measured volume of air through a cassette filter. |
Captures airborne spores for lab analysis to determine type and concentration of mould present. |
 |
Swab Test Kit
Collects surface samples from suspected contamination areas. |
Confirms the presence and type of biological growth on visible or suspected mould surfaces. |
4. Prepare a detailed report with findings and recommendations
Finally, the mould inspector will prepare a report outlining their findings on the condition of the home. This report may include images and short explainer videos to help the homeowner clearly understand what has been discovered within their specific property.
The report should also include a more technical section detailing the recommended next steps. This typically outlines suggested strategies for containment and remediation, which can be shared with a qualified contractor responsible for safely removing the mould and addressing the underlying moisture issues.
How to Hire a Mould Inspector in Quebec?
In Quebec, there’s no strict government license just for mould inspectors, so quality amongst inspectors varies. Some inspectors will simply visit your home, collect a standard set of samples, and send them to a lab. This “one-size-fits-all” approach should generally be avoided, as it fails to account for the unique conditions of each property.
A good mould inspector tailors their approach based on what they observe during the inspection. For example, depending on the situation, they may recommend surface sampling (e.g. swabs or tape lifts), or a PCR analysis to identify specific mould species or toxins. There are many factors that make each situation unique. Because of this, you should look for an inspector with strong investigative skills and experience in building science and indoor air quality.
You should also ask inspectors about their qualifications and professional affiliations. The most reputable inspectors will usually have one or more of the following:
| Certification / Association | What it means (in plain English) | Why it matters |
|---|---|---|
| Institute of Inspection Cleaning and Restoration Certification (IICRC) | Training in water damage, mould growth, and proper remediation standards | Shows the inspector understands how mould develops and how it should be handled safely |
| National Organization of Remediators and Mold Inspectors (NORMI) | Focused specifically on mould inspection, testing, and indoor air quality | Indicates more specialized knowledge in mould-specific investigations |
| Association des inspecteurs en bâtiments du Québec (AIBQ) | Professional association for Quebec building inspectors | Suggests the inspector follows a code of ethics and has general building expertise |
⚠️ Warning
It is generally a good idea to hire an inspector who does not also perform mould remediation. Keeping inspection and remediation separate helps avoid conflicts of interest and ensures that the recommendations you receive are unbiased.
How Expensive is a Mould Inspection In Quebec?
In Quebec, a professional mould inspection typically costs between approximately $850 and $1,200, depending on the size and number of floors in the property. Typically companies include a full on-site inspection, air sampling on each floor of your home, surface testing, and a laboratory analysis report in this price.
How to Get Rid of Mould?
If you were to look at mould under a microscope, it forms a branching network (similar to how ivy looks). The root-like structures (called hyphae) grow down into the surface, and away from the surface. At the top of each hyphae, there are mould spores.

There can be extremely high numbers of spores in even a small area of visible mould. Mould spreads when these spores are released, settle on new surfaces, and begin to grow into new colonies.
The challenge is that when you wipe, spray, or otherwise disturb visible mould, you can release large amounts of spores into the air at once. These airborne spores can then be inhaled, and can also spread to other areas of the home, leading to cross-contamination and new mould growth elsewhere.
Because of this, mould removal isn’t as simple as wiping a surface clean. It needs to be handled in a controlled way, with the underlying moisture issue addressed at the same time.
Let’s look at some common scenarios, and how to deal with mould properly in each one.
- How to get rid of mould on walls permanently?
- How to get rid of mould in the shower?
- How to get rid of mould on window sealant?
How to Get Rid of Mould on Walls Permanently?
To remove mould from the walls permanently, you need to take the following four steps, which are designed to prevent cross-contamination and complete, and permanent removal of mould. It’s also essential to address the root cause of the problem — typically excess moisture — otherwise the mould will return.
1. Build a Containment Chamber
Step 1 is to build a containment chamber. The diagram below shows what this looks like.
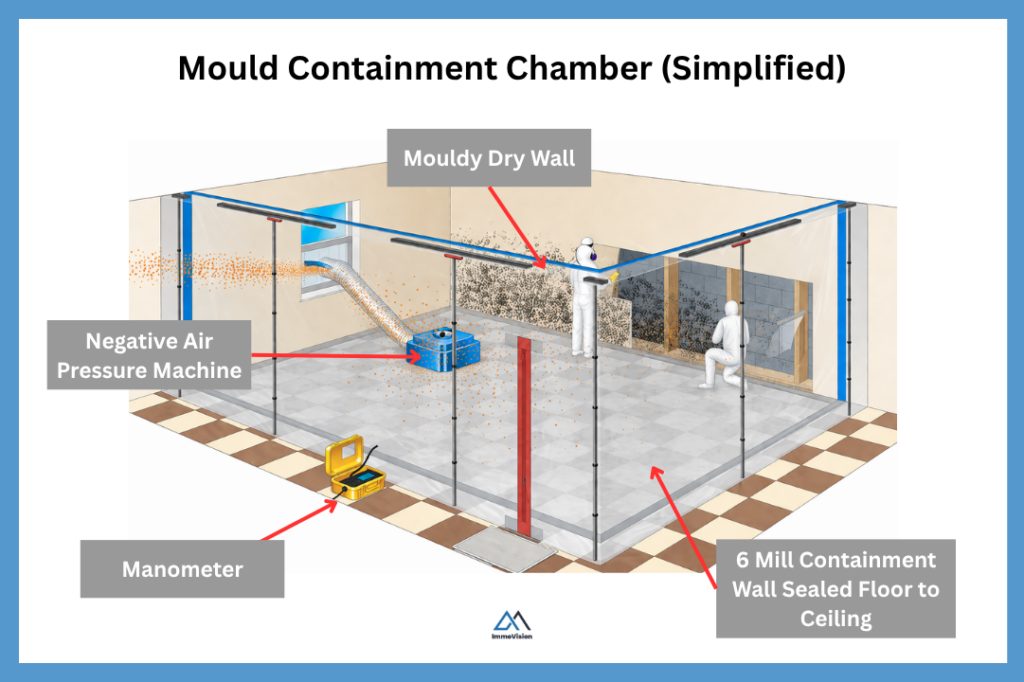
The containment chamber acts as a sealed physical barrier around the mould-affected area. Its purpose is to isolate the space and prevent mould from spreading to other parts of the building. The enclosure must be durable enough to withstand movement in and out, as well as the forces created by negative air pressure.
2. Set Up Negative Air Pressure
A negative air pressure machine is used inside the chamber to continuously draw air out. This captures mould spores that are released during the cleaning process, preventing them from escaping and causing cross-contamination.
To ensure the system is working effectively, negative air pressure must be maintained at all times within the containment chamber. This requires continuous monitoring throughout the mould remediation process.
3. Demolition
Once the containment chamber is sealed and negative air pressure is operating, the damaged materials can be removed safely.
Building materials generally fall into two categories during mould remediation: porous and semi-porous.
Porous materials such as drywall and insulation, cannot usually be salvaged. Mould penetrates deep into these materials, making complete removal impossible. To permanently eliminate the contamination, these materials must be physically removed and replaced.
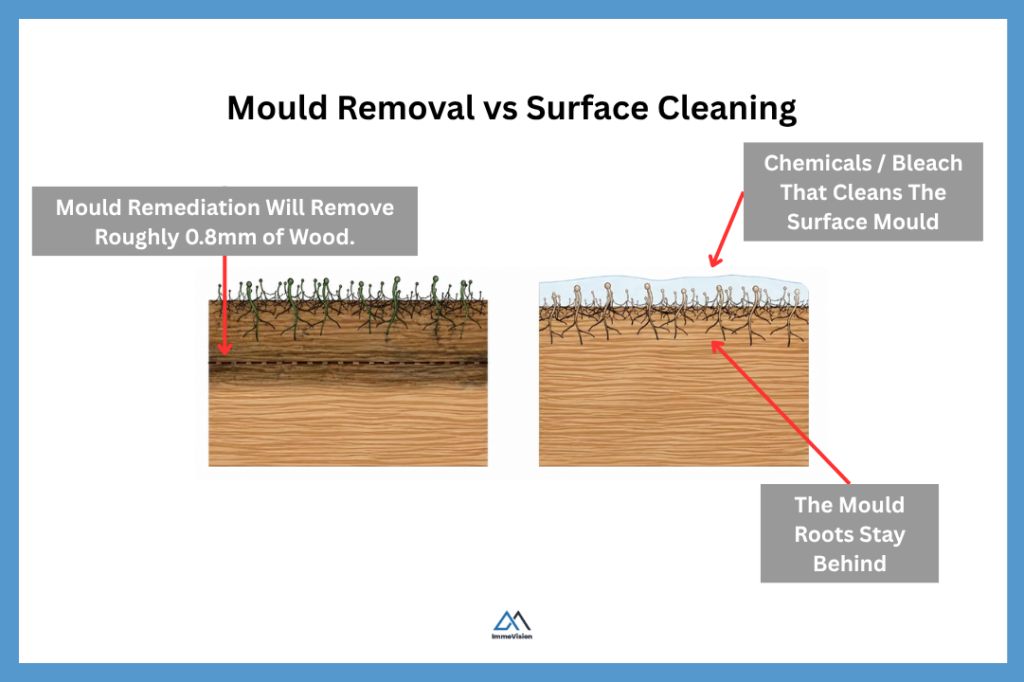
Semi-porous materials such as timber framing, concrete, brick, and plaster can often be saved if they are properly treated. To do this, you need to understand that visible mould grows root-like structures (the hyphae) into the material. Because of this, simply wiping the surface or applying a store-bought chemical will only remove the visible mould and will leave the underlying growth behind.
To properly remove mould from semi-porous materials, the affected surface must be stripped back to below the depth of the hyphae. This is commonly done using: sanding, wire brushing, or media blasting. The image below shows why surface cleaning alone does not remove mould that has penetrated beneath the material surface.
4. Deep Cleaning
After the demolition, there should be no visible mould colonies remaining. However, the containment area will still be contaminated with mould spores. The majority of these spores will settle onto the floor, while others can remain airborne for up to two hours before eventually settling.
Deep cleaning is therefore essential to remove all mould spores and mycotoxins so that the area is fully decontaminated, safe for reoccupation, and does not pose a risk of future mould regrowth or cross-contamination. Deep cleaning typically involves the following three steps.
- Vacuuming: Mould spores are removed by thoroughly vacuuming the entire containment area using a HEPA vacuum (High-Efficiency Particulate Air). These vacuums are specifically designed to capture very fine particles, including mould spores, without redistributing them back into the air.
- Damp Wipe: Mycotoxins and fine particulate residue can remain stuck to surfaces even after vacuuming. This is because the mycotoxins are sticky. You can use a damp cloth to wiping every surface and an approved antimicrobial cleaner. The goal is to break the sticky mycotoxins from the surface.
- Vacuum again: Once surfaces have been wiped and allowed to dry, the area is vacuumed a second time with a HEPA vacuum to capture any remaining particles that were loosened during the cleaning process.
Whilst you won’t be able to remove every single particle, these three steps significantly reduce the overall spore and toxin load. This will bring the area back to a safe, normal indoor level and minimize the risk of future regrowth or cross-contamination.
How to get rid of mould in the shower?
Removing mould in a shower depends on the type of surface it has grown on.
If the mould is on non-porous materials such as ceramic tiles, metal fixtures, plastic surfaces, or porcelain, you can usually remove it by cleaning with soap and water (or an appropriate bathroom cleaner). After cleaning, it’s important to vacuum and thoroughly deep clean the surrounding area, and ensure the space is well ventilated to prevent moisture buildup.
If mould has developed in the caulking around the shower, the best approach is to remove and dispose of the affected sealant, then reapply fresh caulking once the area is clean and dry. Similarly, mould on non-porous items like plastic exhaust fans or fixtures can typically be cleaned without needing to replace the material.
However, if mould has penetrated semi-porous or porous materials such as wooden cabinets, drywall, or other absorbent surfaces, it may not be possible to fully remove it through surface cleaning alone. In these cases, the affected materials may need to be removed and replaced, or professional remediation may be required, similar to the process described earlier.
In all cases, it’s essential to identify and fix the underlying cause of the moisture (such as leaks or poor ventilation). Without addressing the root cause, mould is likely to return.
How to get rid of mould on window sealant?
The two easiest ways to get rid of mould on window sealant are to remove and replace the sealant entirely, or to clean it using a mould-specific cleaner (such as a diluted bleach solution or a commercial mould remover).
If you choose to clean the mould, start by putting on a respirator mask and opening the window to improve ventilation. You can then apply your chosen mould cleaner to the affected sealant.
Because this process can release mould spores, it’s best to direct the spray toward the open window to help minimise the number of spores that spread into the room.
Allow the cleaner to sit on the sealant for around 10–15 minutes (or as directed on the product label), then wipe it away using a disposable cloth or paper towel. Dispose of the cloth immediately after use to avoid spreading contamination.
How Much Does Mould Remediation Cost in Quebec?
Mould remediation in Quebec typically starts at around $865 for small, localized issues, but costs can quickly climb into the thousands depending on the extent of contamination. Pricing is largely driven by the size of the affected area, whether materials like drywall or insulation need to be removed, and the level of containment required during the process. More complex cases such as hidden mould behind walls, or structural damage, will significantly increase the overall cost.
Whilst most mould remediation companies will remove and dispose of contaminated materials like insulation, they will not always include replacement as part of their base service. Reinstalling new insulation, drywall, or other finishes is often treated as a separate step or additional cost, so it’s important to clarify what’s included when comparing quotes.
💲 Note
Before hiring a remediation company, it’s advisable to first obtain a professional inspection. Use the resulting report and recommended next steps to compare quotes and proposed solutions from multiple contractors, ensuring you choose the most effective and cost-efficient approach.
Buyers: How to protect yourself in a real estate transaction in Quebec
Buyers should look for signs that a property may have mould when viewing a property they are considering purchasing, buyers should be alert to potential signs of mould. This includes:
- The presence of stains or discoloration on walls, ceilings, carpets, around windows, and inside closets
- A musty or earthy odour within the property
- Signs of excess humidity, such as condensation on windows, doors, walls, or inside cupboards
- Indicators of water infiltration, such as bubbling or peeling paint
If any concerns arise, buyers should include a clause in the promise to purchase stating that their offer is contingent on the home being professionally inspected for mould and moisture-related issues. Additionally, if there has been any history of water infiltration or plumbing leaks, the seller is legally required to disclose this information in the seller’s declaration.
❗Note
If you are working with a real estate agent, they are not qualified to diagnose a mould problem. However, they can point out visible signs of mould and inform you of any disclosures made by the seller regarding past or present mould or moisture issues.
Sellers: How to protect yourself in a real estate transaction in Quebec
In Quebec, mould is often considered a latent defect. This means that if you sell your house, you could be held responsible if hidden mould problems are discovered after the sale. This is especially the case if you knew about the issue, and simply painted over the mould without disclosing it to the buyer. Not knowing about a problem does not automatically protect you. If the mould was present at the time of the sale and meets the legal definition of a latent defect, the buyer may still be able to seek financial compensation after the deal has closed.
Your listing agent will ask you about any mould, moisture, or leaks that you are aware of when you complete the seller’s declaration. This is so that any known issues are properly disclosed to potential buyers. This transparency helps protect both parties and reduces the risk of disputes or legal action after the sale.
Many listing agents will also recommend that you complete a pre-listing inspection so that you can uncover any hidden issues before listing the property. This will allow you to understand the condition of your home, budget and plan appropriate repairs in advance, rather than reacting to problems during negotiations or after the sale.
Frequently Asked Questions About Mould
DIY mould test kits have limited value because they produce high rates of false positives, as mold spores are naturally everywhere. A more reliable approach is a professional mould inspection, where an expert assesses moisture conditions, performs targeted air or surface sampling, and identifies the underlying cause of the problem. This is especially important if you suspect hidden mould inside walls or ceilings.
Over time, this allows mould to spread both on the surface and behind the walls, where it can continue to grow if it is not properly removed and if the source of moisture is not addressed.
Problems arise when mould is actively growing indoors, increasing the concentration of spores in the air. This can lead to symptoms similar to allergies, such as sneezing, congestion, and itchy eyes. People with asthma, allergies, or weakened immune systems may experience more severe or persistent effects.
Professional mould removal often involves containment and air filtration to prevent spores from spreading. Depending on the severity, contractors may recommend vacating certain areas or the entire home until the work is complete.
However, colour alone is not a reliable way to identify mould or determine its risk. Many types of mould can appear black, and the potential health impact depends more on the level of exposure and indoor conditions than the specific type.
Final Remarks
Mould is a common issue in Quebec homes, but it becomes a serious problem when moisture is left unchecked. The key is not just removing visible mould, but identifying and fixing the underlying source of humidity or water intrusion. Acting early can prevent costly structural damage and reduce potential health impacts over time.
If you suspect mould, especially hidden growth, it’s often worth investing in a professional inspection. A clear, unbiased report allows you to make informed decisions, compare remediation options, and avoid unnecessary work. Whether you’re maintaining your home or navigating a real estate transaction, understanding how mould develops and spreads puts you in a much stronger position to protect both your property and your health.